rolled sugar cookies.
Posted in baking, cookies, favorites, holiday, recipes, sweet | 8 comments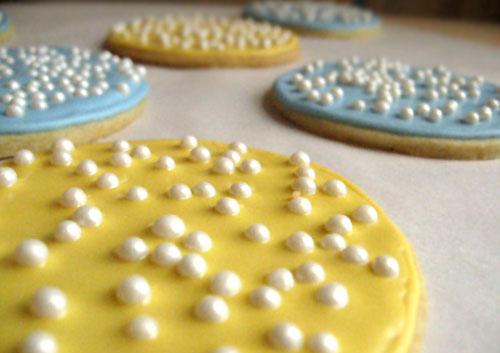
While sucked into the irresistible black hole that is the baking supply aisle at Michael’s craft store, I was mesmerized by the seemingly endless assortment of sprinkles, gel food colorings, pastry tips, cake molds, cookie cutters and cupcake cups. Thankfully, I periodically managed to snap myself out of the desire to purchase any and all of these oh-so-tempting baking accessories, decorations and tools.
I was unable, however, to resist the pull of the vials of Wilton pearlized jumbo sprinkles, called Sugar Pearls. At one point I had four jars of these pastel-colored decorative edibles in hand — white, pink, blue and green — but at $8 a pop, my left brain overtook my right and I settled on the simple, classic and versatile white sugar pearls.

sugar cookies decorated with royal icing and pearlized sprinkles.
With the wide assortment of holiday baked goods that have been flying out of my kitchen over the past couple of weeks, by far the absolute favorite treat (at least among the under-ten-set in my family) were these rolled sugar cookies, decorated simply with royal icing and (you guessed it) my Michael’s find of pearly white sugary spangle.
Keep this recipe on hand year-round, as rolled-out sugar cookies cut in seasonal shapes make for fun and festive treats any time of year: Valentine’s Day hearts, St. Patrick’s Day clovers, ornately decorated eggs, bunnies and chicks for Easter, Spring flowers, pumpkins, ghosts and ghouls for Halloween. Not to mention themed cookies for baby showers, birthdays, weddings and other special occasions…. you get the idea.
Rolled Sugar Cookies
Preheat oven to 400 degrees F
Cookie Ingredients
2¾ cups all purpose flour
2 tsp baking powder
1 tsp salt
1 cup unsalted butter, softened
1½ cups sugar
1 egg
1½ tsp vanilla extract
½ tsp almond extract
Royal Icing Ingredients
¾ cup warm water, plus more as needed
5 tbsp meringue powder
1 tsp cream of tartar
1 kg icing sugar
*1 tsp clear vanilla (only if your meringue powder does not contain vanilla flavor, called vanillin)
gel food coloring, as desired
sprinkles (optional)
Tips
- Do not chill this cookie dough before rolling it out.
- If your oven is a bit uneven, rotate your cookie sheet in the oven mid-way through baking to ensure even browning and prevent burnt bits.
- Cookies larger than a 3-inch diameter might need a bit more time in the oven; likewise, smaller cookies will need less. Keep a watchful eye to prevent over-browning.
- **For an excellent tutorial on decorating and “flooding” cookies using royal icing, please do check out Sweetopia.net. Here’s a direct link to Marian’s wonderful step-by-step cookie flooding tutorial as well as her top 10 tips for decorating with royal icing.
- ***Marian’s 10-second rule/test for the ideal consistency for royal icing: if after a knife has been dragged through the royal icing (in the bowl) it takes 5 to 10 seconds for the surface of the icing to become completely smooth, you have the proper consistency for flooding. If it takes more time, your icing may be too thick and will likely need a bit more water added to make it flood-ready. If it takes much less time than this, your icing is too runny and will need to be mixed longer to thicken up, and/or have small amounts of sifted icing sugar mixed in to thicken it up.
Cookie Directions
- Line a cookie sheet with parchment paper.
- In medium bowl, whisk together flour, baking powder and salt.
- In large mixing bowl, cream butter and sugar until light and fluffy.
- Beat in egg, vanilla and almond extracts.
- Add flour mixture to butter mixture 1 cup at a time, mixing well after each addition.
- Divide dough into 2 balls.
- On floured surface roll 1 ball into approximately a 12-inch diameter circle, 1/8-inch thick.
- Cut out desired shapes, dipping cutter in flour before each cut.
- Remove cookies to prepared cookie sheet with an offset spatula, spacing cookies 1-inch apart.
- Bake cookies in preheated (400 degree F) oven for 6-7 minutes, or until cookies are a light golden brown.
- Remove to wire rack to cool fully before decorating; if decorating on another day, store cookies stacked in an air-tight container.
- Makes approximately 3 dozen 3-inch cookies.
Royal Icing Directions**
- Combine ¾ cup warm water and meringue powder in mixing bowl, whisking until thick and frothy, about 30 seconds.
- Add cream of tartar and whisk for another 30 seconds.
- Add all of the icing sugar into the mixing bowl, place bowl on mixer, and mix on lowest speed using the paddle attachment for a full 10 minutes.
- Cover bowl with plastic wrap or a dampened tea towel to prevent a crust from forming. You may need to add small amounts of water to the icing (followed by thorough mixing) to reach the desired consistency.***
- Tint all or portions of the thick and creamy icing with food coloring, as desired; add to pastry bags fitted with a number 3 tip and tied-off at the top with elastic bands (to prevent drying out).
- Create a dam around the outline of the cookie; allow to set for 15 minutes.
- Flood interior of cookie (or dammed shape) with icing, covering the cookie using a zig-zag application and using a toothpick to even out the coverage until smooth and evenly filled or “flooded.”
- If using sprinkles or other decorative accessories, add before icing dries (so long as their pigment won’t leech into the royal icing), or “glue” on after the icing has firmed up using more royal icing.
- Allow to dry 24 hours before packaging (the icing will prevent cookie from drying out).
Cookie Recipe from Wilton Cookie Exchange
Royal Icing Recipe from Sweetopia.net


