grissini.
Posted in baking, breads, recipes, savory, yeast breads | 9 comments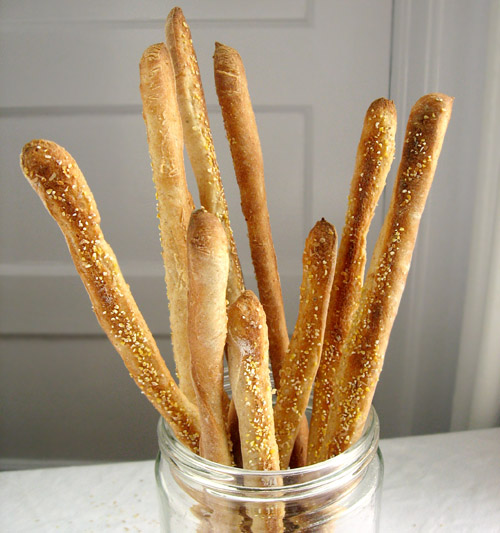
I don’t know about you, but thanks to the fast food nation we now live in and the proficient marketing of processed food, when I hear the word “breadsticks,” unfortunately my mind conjures up thoughts of greasy, doughy, bloated blocks of bread sandwiched together in a pizza box, served with a side of one or another variety of mysterious dipping sauce. Or the one of a billion, store-bought, frozen, oven-ready breadsticks — akin to the upscale breadstick that you might expect to find at the average pasta franchise — which, although quick and easy, are quite generic and filled with preservatives and artificial flavors.

crunchy, flavorful & surprisingly easy to make.
Well, sorry, but I have no interest in any of those typically North American breadsticks. I’d much rather a grissini: a crunchy, flavorful breadstick reminiscent of those found in northern Italy and Spain.
These spindles of crispy bread are surprisingly simple and easy to make, and are wonderfully special when served at a dinner party as part of a spread of home made tapas, or even as a healthy afternoon snack for the kiddies when dipped in hummus or almond butter and served alongside carrot sticks and apple wedges.

serve on their own, with hummus, nut butters, cheese & dips, soups, salads, pasta, stew...
Grissini
Ingredients
3½ cups all purpose flour, plus more as needed
2 tsp salt
1 tsp instant yeast
1 tbsp honey
2 tbsp extra-virgin olive oil, plus extra for greasing the bowl
1½ cups water
cornmeal or semolina flour

sprinkle baking sheets lightly with cornmeal or semolina flour.

think outside the spindle: twisted grissini.
Tips
This recipe can be made with a large food processor or by hand. The main sequence of directions below includes instructions based on using a food processor, since that’s what I use, but if you’re making it by hand, please refer to the first step here:
By Hand Step 1 Method (the method to take if you’ve got a bit of extra time and need an arm workout):
- In a large bowl, combine ½ the flour with the salt and yeast whisk to blend.
- Mix together the honey, oil and water; add the water mixture to the flour mixture and stir with a wooden spoon, until smooth.
- Add remaining flour, a bit at a time, stirring until the mixture becomes to stiff to stir with a spoon.
- Begin kneading, adding as little flour as possible — just enough to keep the dough from being a sticky mess.
- Knead until smooth but still quite moist, about 10 minutes. Pick up at Step 5, below…

ready to rise.

after rising( covered) for 1½ hours.

shape risen dough into a rectangle; let rest; then get ready to strip and/or twist!
Directions
- Place the flour in the container of the food processor fitted with the steel blade; add the salt and yeast and whiz for 5 seconds.
- Turn the machine on, leave it running, and add the honey, oil and water through the feed tube. Process for 30 seconds.
- The dough should be a nicely defined, only slightly sticky ball. If it is too dry, add more water 1 tbsp at a time and process for another 5 to 10 seconds after each addition. Too dry? Add another tbsp of flour and process briefly.
- Knead for a couple of minutes by hand.
- Shape dough into a ball, place in a lightly oiled bowl and cover with plastic wrap or a damp towel.
- Let rise for at least 1½ hours, until doubled in bulk.
- Punch the ball of dough to deflate it; shape into a flat rectangle and let rise (covered in wrap or a towel) on a lightly floured board, about 15 minutes.

straight-laced...
- Working along the long side of the rectangle, cut the dough into thin strips. Pull and roll them into long, roughly cylindrical stick, then place on a cornmeal covered baking sheet. Don’t try to make them too perfect or identical — part of the beauty of home made, traditional grissini are their irregular or unique shapes. Feel free to experiment with shapes and have fun twisting the strips or spiraling 2 lengths together.

twist for more fun!
- Cover and let rest while you preheat the oven to 450 degrees F.
- Bake on baking sheets (or baking stones) for 15 minutes, or until lightly browned.
- Cool on wire racks before serving.
Storage
- Grissini are best served the day you make them, but also keep pretty well wrapped tightly in waxed paper or stored in a tall jar or tin.

perfect for a sophisticated spread of tapas and cocktails or as a simple snack that the kiddies will love.


Sounds good and fabulous snaps!
Thank you!
Awesome grissini!! Im gonna make it as my to-bake-list..Haha=D
Do you add the yeast in powder form? You don’t need to proof it?
Yes, I used active instant yeast (very fine granules), and this form of yeast can be mixed in with the dough directly (without having to be proofed/tested/mixed in water first) and responds to water at almost any temperature (except perhaps ice water). In terms of proofing as in resting/rising the dough to allow it to ferment/leaven the dough, it rises for an hour and a half in the bowl, another 15 minutes before cut into strips and then briefly “proofs” again once it’s in the stick form as you heat the oven. It’s easy and works really well for these breadsticks.
Thanks, making it today!
Lovely, and appreciative of the reminder that aspiration to perfection can itself be a flaw. To the dough I added chopped rosemary and thyme, to the flattened piece I sprinkled coarse salt and pepper. Simple and elegant addition to olives, salamis, and cheeses. Thanks.
Thanks for your note Rachel – your additions sound delicious!
Johneen