classic fruit tart.
Posted in baking, fruit, fruit desserts, pastry, pies & tarts, recipes | 14 comments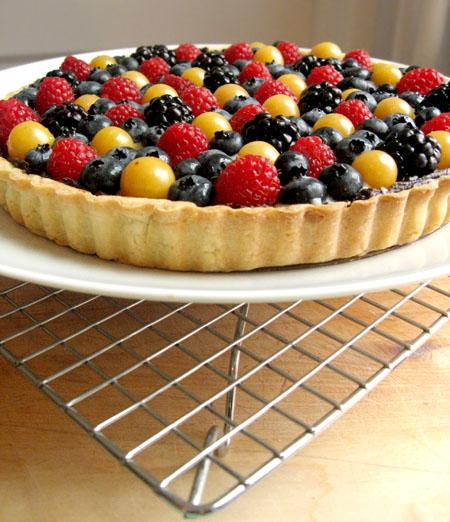
Looking for a dessert that’s refreshing, delicious and will knock the socks off of your dinner guests? This special confection ticks all the boxes, thanks to a dazzlingly impressive appearance, sweet pastry crust (pâte sucrée) evocative of a sugar cookie, a hidden chocolate lining, a velvety rich pastry cream filling (crème pâtissière), and — last but certainly not least — a beautifully arranged crown of fresh fruits and berries.
vibrant fresh fruit makes this tart pretty as a picture.
Make no mistake, the fact that this classic fruit tart is impressive is no accident; this recipe produces a fruit tart that you would expect to find in a fine pastry shop. While not necessarily difficult, the whole thing is a bit labor intensive, with several time-sensitive steps requiring an attentive eye, and may challenge the novice baker. I sent away the hubby and kids for the afternoon to ensure that I would not be distracted or pulled away from my work… a small price to pay for such a delish finale to their Sunday dinner.

fruit can be arranged in conecentric circles, placed randomly, or piled haphazardly upon the reme pâtissière
Classic Fruit Tart
Preheat oven to 400 degrees F and place rack in center of oven
Sweet Pastry Crust Ingredients
1 ½ cups all-purpose flour
1/8 tsp salt
½ cup unsalted butter
¼ cup sugar
1 large egg, lightly beaten
8-9-inch fluted tart pan with removable bottom
Pastry Cream Ingredients
1 ¼ cups milk
½ vanilla bean, split lengthwise or 1 tsp vanilla extract
3 large egg yolks
¼ cup sugar
1/8 cup all-purpose flour
4 tbsp tapioca starch (or 2 tbsp cornstarch)
2 tsp liqueur (i.e. Grand Marnier, Brandy, Kirsch) (optional)
Chocolate Lining
2-3 oz. semisweet chocolate, melted
Fruit Topping
2 – 3 cups of fresh mixed fruit, such as blackberries, blueberries, raspberries, ground cherries, strawberries, kiwifruit, small plums, bananas, etc., gently washed and dried.

the sweet pastry crust for this classic fruit tart resembles a sugar cookie in taste and texture.
Tips
- This dish is best eaten the same day it is assembled. If you don’t have an entire morning or afternoon to dedicate to making it, feel free to make the pastry shell and pastry cream a day in advance. Then all you need to do is fill the baked (chocolate lined) fruit tart with the pastry cream and spend a little time making it look pretty by garnishing with the fruit.
- The fruit topping gives a wow factor to the first impression of this dessert, and you are limited only by your imagination and the season’s (or grocer’s) bounty. The most important thing to consider is that the fruit is fresh and looks and tastes brilliant.
- Berries may be used whole, but you will need to peel and slice fruits like bananas or kiwis, and will also have to slice large strawberries.
- When rolling pastry, to prevent the pastry from sticking to the floured surface and to ensure uniform thickness, keep lifting up and turning the pastry a quarter turn as you roll. Always roll from the center of the pastry outwards to get uniform thickness.
- Never pull pastry or you will get shrinkage in your finished tart shell, never a good thing.

pricking with a fork and using pie weights prevent the tender sweet pastry from puffing up too much while baking.
Sweet Pastry Crust Directions
- Sift or whisk together flour and salt in a small bowl.
- Beat butter in mixer until softened.
- Add sugar and beat until light and fluffy.
- Slowly add the lightly beaten egg, beating on low just until incorporated.
- Add the flour mixture to mixer all at once and mix just until it forms a ball — do not over mix or the finished pastry will be hard and cardboard-like.
- Remove pastry from mixer and form a ball; flatten into a disk, cover with plastic wrap and refrigerate for 20 minutes (or freeze for 10 minutes) or until firm. This will ease rolling. (You can also refrigerate the pastry for a day or two, or freeze almost indefinitely.)
- On a lightly floured surface, roll out the pastry into an 11-12-inch circle, approximately 1/8-inch thick. Ensure the pastry is the right size by flipping the tart pan lightly onto rolled-out circle; the pastry should be at least 1 inch larger than the pan.
- Lightly roll pastry around rolling pin, dusting off any excess flour. Unroll onto top of tart pan.
- Gently lay pastry in pan — remember, no pulling — and lightly press pastry into bottom and up sides of pan with a small floured piece of pastry.
- Glide rolling pin over top of tart pan to trim excess pastry.
- Prick bottom of dough with a fork to prevent it from puffing up as it bakes.
- Cover and refrigerate for 20 minutes to chill the butter and rest the gluten.
- Line unbaked pastry shell with aluminum foil or parchment paper and fill with pie weights, rice or beans, filling to the top of the pan, evenly distributed.
- Bake pastry in the center of your preheated (400 degree F) oven for 20-25 minutes until the crust is dry and light golden brown.
- Remove weights and cool crust completely on wire rack before filling.

making a smooth and velvety cream filling requires great attention, constant whisking, and speed.
Pastry Cream Directions
- In medium stainless steel bowl, combine sugar and egg yolks with a wooden spoon. Do not let the mixture sit too long or chunks of egg will form.
- In separate bowl, sift flour and tapioca starch together; add to egg mixture, mixing until you get a smooth paste.
- Meanwhile, in saucepan combine milk and split vanilla bean (or vanilla extract) on medium heat until boiling. Note: the milk will foam up quickly to the top of pan when done, so watch very carefully.
- Remove milk from heat; add slowly to egg mixture, whisking constantly to prevent curdling. If you do get some curdling (clumps of egg) in the mixture, pour through a strainer.
- If using vanilla bean, remove bean, scrape out seeds, and add seeds to egg mixture.
- Pour egg mixture into a medium saucepan and cook over medium heat until boiling, whisking constantly.
- Once it boils, continue to whisk constantly for another 30-60 seconds until it becomes very thick and difficult to stir.
- Remove from heat and immediately whisk in the liqueur (if using).
- Pour into a clean bowl and immediately cover with plastic wrap to prevent a crust from forming.
- Cool. If not using right away, refrigerate until needed, for up to 3 days.
- Beat before using to remove any lumps that may have formed.

form, function & flavor: not every tart has a chocolate lining, but this one does.
Tart Assembly
- To remove baked tart shell from the fluted sides of the tart pan, place your hand under the pan, touching only the removable base, not the sides. Gently push the tart straight up and out of the pan. The fluted tart ring will fall away and slide down your arm.
- You can continue to assemble the tart on top of the metal pan bottom, but to remove the bottom of the pan, run a thin metal spatula or knife between the crust and metal bottom, and transfer the tart shell onto a cardboard cake round.
- Spread a thin layer of melted chocolate over the bottom and sides of the baked tart shell to prevent the crust from getting soggy (from the cream filling). Let the chocolate glaze dry between 20-30 minutes (or stick it in the freezer for a few minutes to solidify it faster).
- Spread the pastry cream onto the bottom of the now chocolate-lined baked tart shell, filling about ¾ full.
- Decorate with fresh fruit, attempting to cover all of the pastry cream with fruit.
- If not serving right away, refrigerate. Bon appetit!

assemble the tart just before serving.
Optional Glaze
Some people like to glaze a fruit tart by lightly brushing it with jam or jelly that has been diluted with water or liqueur, warmed and then strained, to add a sheen to the fruit and prevent it from drying out. I skipped this step, as I prefer the natural look of the fruit, but glazing may be a good option if you have used a lot of sliced fruit and/or are not serving the dessert within a few minutes of assembling it. Apricot or red currant jelly are good picks when choosing a preserve with which to glaze your tart.

yum.


I love the look of your tart. The fruits you used makes it seem as if your tart is covered with jewels. Just lovely.
You did such a beautiful job! I can’t wait to try this. Love the thin layer of chocolate. Thanks so much for sharing.
Kathleen
Thanks Kathleen, it really is worth the effort!
Your fruit tart is not only delicious, yummy and but looks like a big piece of art! It is amazing looking and I like step by step pictures!
What is small yellow fruit?
Thank you, Pam! The small yellow fruit are ground cherries, a lovely fruit that tastes like a cross between a tomato and a melon or even pineapple (depending on the variety you get). The grow locally and are related to tomatoes. Here’s a post I put up about them: http://sweetgirlconfections.com/2010/09/13/ground-cherries
Wow. I LOVE how totally OCD you’ve been with the fruit arrangement. Beautiful berry selection and world-class composition. I’m impressed.
Why, thank you! That means a lot coming from a man who’s sampled the best pastry in Paris ~ Merci beaucoup, Monsieur!
Your tart look great! I wonder do you “GREASE” the removeable fluted tart pan? Thanks!
Thanks! Yes, I did with just a little butter.
Hmm.. Okay. Got some garden tips there. Nice one. Didn’t expect to learn something new from this classic fruit tart. | Sweet Girl Confections article. So, thanks! :P
Anyway, speaking of which, I wrote a gardening article myself at my gardening site here: http://www.growinggardening.com/. Do give me your thoughts on that and comment there. Appreciate it!
Tina Gail the Gardener :)
Great information :)
Once refrigerated, does the chocolate harden making it to difficult to slice?
Hi Sally – no, the hardened chocolate is still perfectly “slicable” with a sharp knife that would be used on cutting pastry. Bon appetit!